<?xml version="1.0" encoding="UTF-8"?><feed xmlns="http://www.w3.org/2005/Atom" xmlns:dc="http://purl.org/dc/elements/1.1/">
                                        <id>https://www.sleepycynic.com/tech-art-blog</id>
                                            <link rel="self" href="https://www.sleepycynic.com/tech-art-blog"></link>
                                <title><![CDATA[Tech Art Blog]]></title>
                                                                                                                <updated>2022-11-07T19:31:45+00:00</updated>
                        
            <entry>
            <title><![CDATA[Dance With Me: Making My First Music Video in UE]]></title>
            <link rel="alternate" href="https://www.sleepycynic.com/tech-art-blog/tech-art-rigging/dance-with-me-making-my-first-music-video-in-ue" />
            <id>https://www.sleepycynic.com/tech-art-blog/tech-art-rigging/dance-with-me-making-my-first-music-video-in-ue</id>
            <author>
                <name><![CDATA[JaNiece Campbell]]></name>
                                    <email><![CDATA[jmc31899@gmail.com]]></email>
                            </author>
            <summary type="html">
                <![CDATA[<p> </p>
<p style="text-align: center;"><iframe src="https://www.youtube.com/embed/7d02xjZ4U8s" width="800" height="449" allowfullscreen="allowfullscreen"> </iframe></p>
<p> </p>
<p style="text-align: center;">Hello there, it's been a while! Since my last post, I've graduated with two degrees and started an internship at Epic Games as an Art Pipeline Developer. Life's been crazy, and there's so much more to come, but it's about time that I dissected my magnum opus. For my senior project, I settled on creating a short music video that combined a few original character designs, motion captured dance moves, and the lipsyncing script from my previous post, all wrapped up and rendered real time in Unreal 4. This was such a blast to work on and a huge learning experience.</p>
<h4>Concept &amp; Early Art</h4>
<p>There were a few essential items I knew that I wanted from the start of this project: a focus on the lipsyncing, use of motion capture, and a cartoony, relaxed art style that could handle the sillyness of motion capture. That last one was both a presentational requirement and a sanity check: I'm very familiar with the... "goofy" nature of base motion capture, especially combined with a simpler art style. But that works perfectly in my favor! The last thing I wanted for this project (and for my artwork in general) was to take the subject matter too seriously. This was my last hoorah as a college student, so what better way to sign off my education than with a 90s style music video of demons in a nightclub?</p>
<p> </p>
<p>
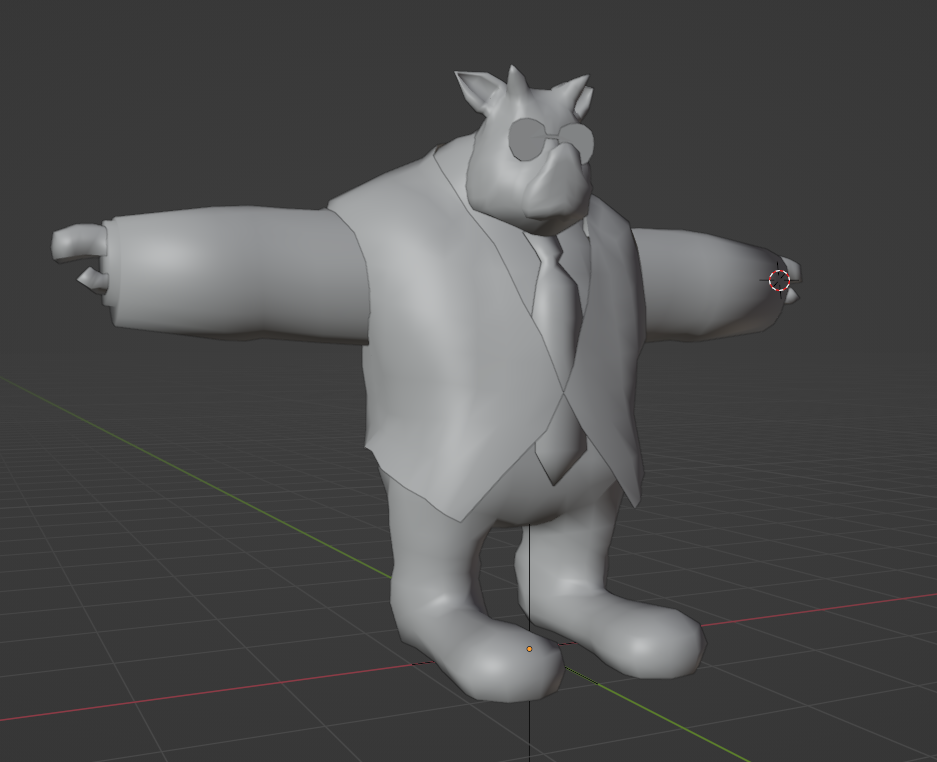
Naturally, I started with a few sketches. I started with the pig/boar men.</p>
<p style="text-align: center;"><img src="https://static.ucraft.net/fs/ucraft/userFiles/sleepycynic/uploaded-media/senior-project-planning.jpg" alt="" width="609" height="430" data-height="503" data-width="712"></img>   <img src="https://static.ucraft.net/fs/ucraft/userFiles/sleepycynic/uploaded-media/main-guy.jpg" alt="" width="607" height="429" data-height="429" data-width="607"></img></p>
<p style="text-align: center;"> </p>
<p style="text-align: left;">
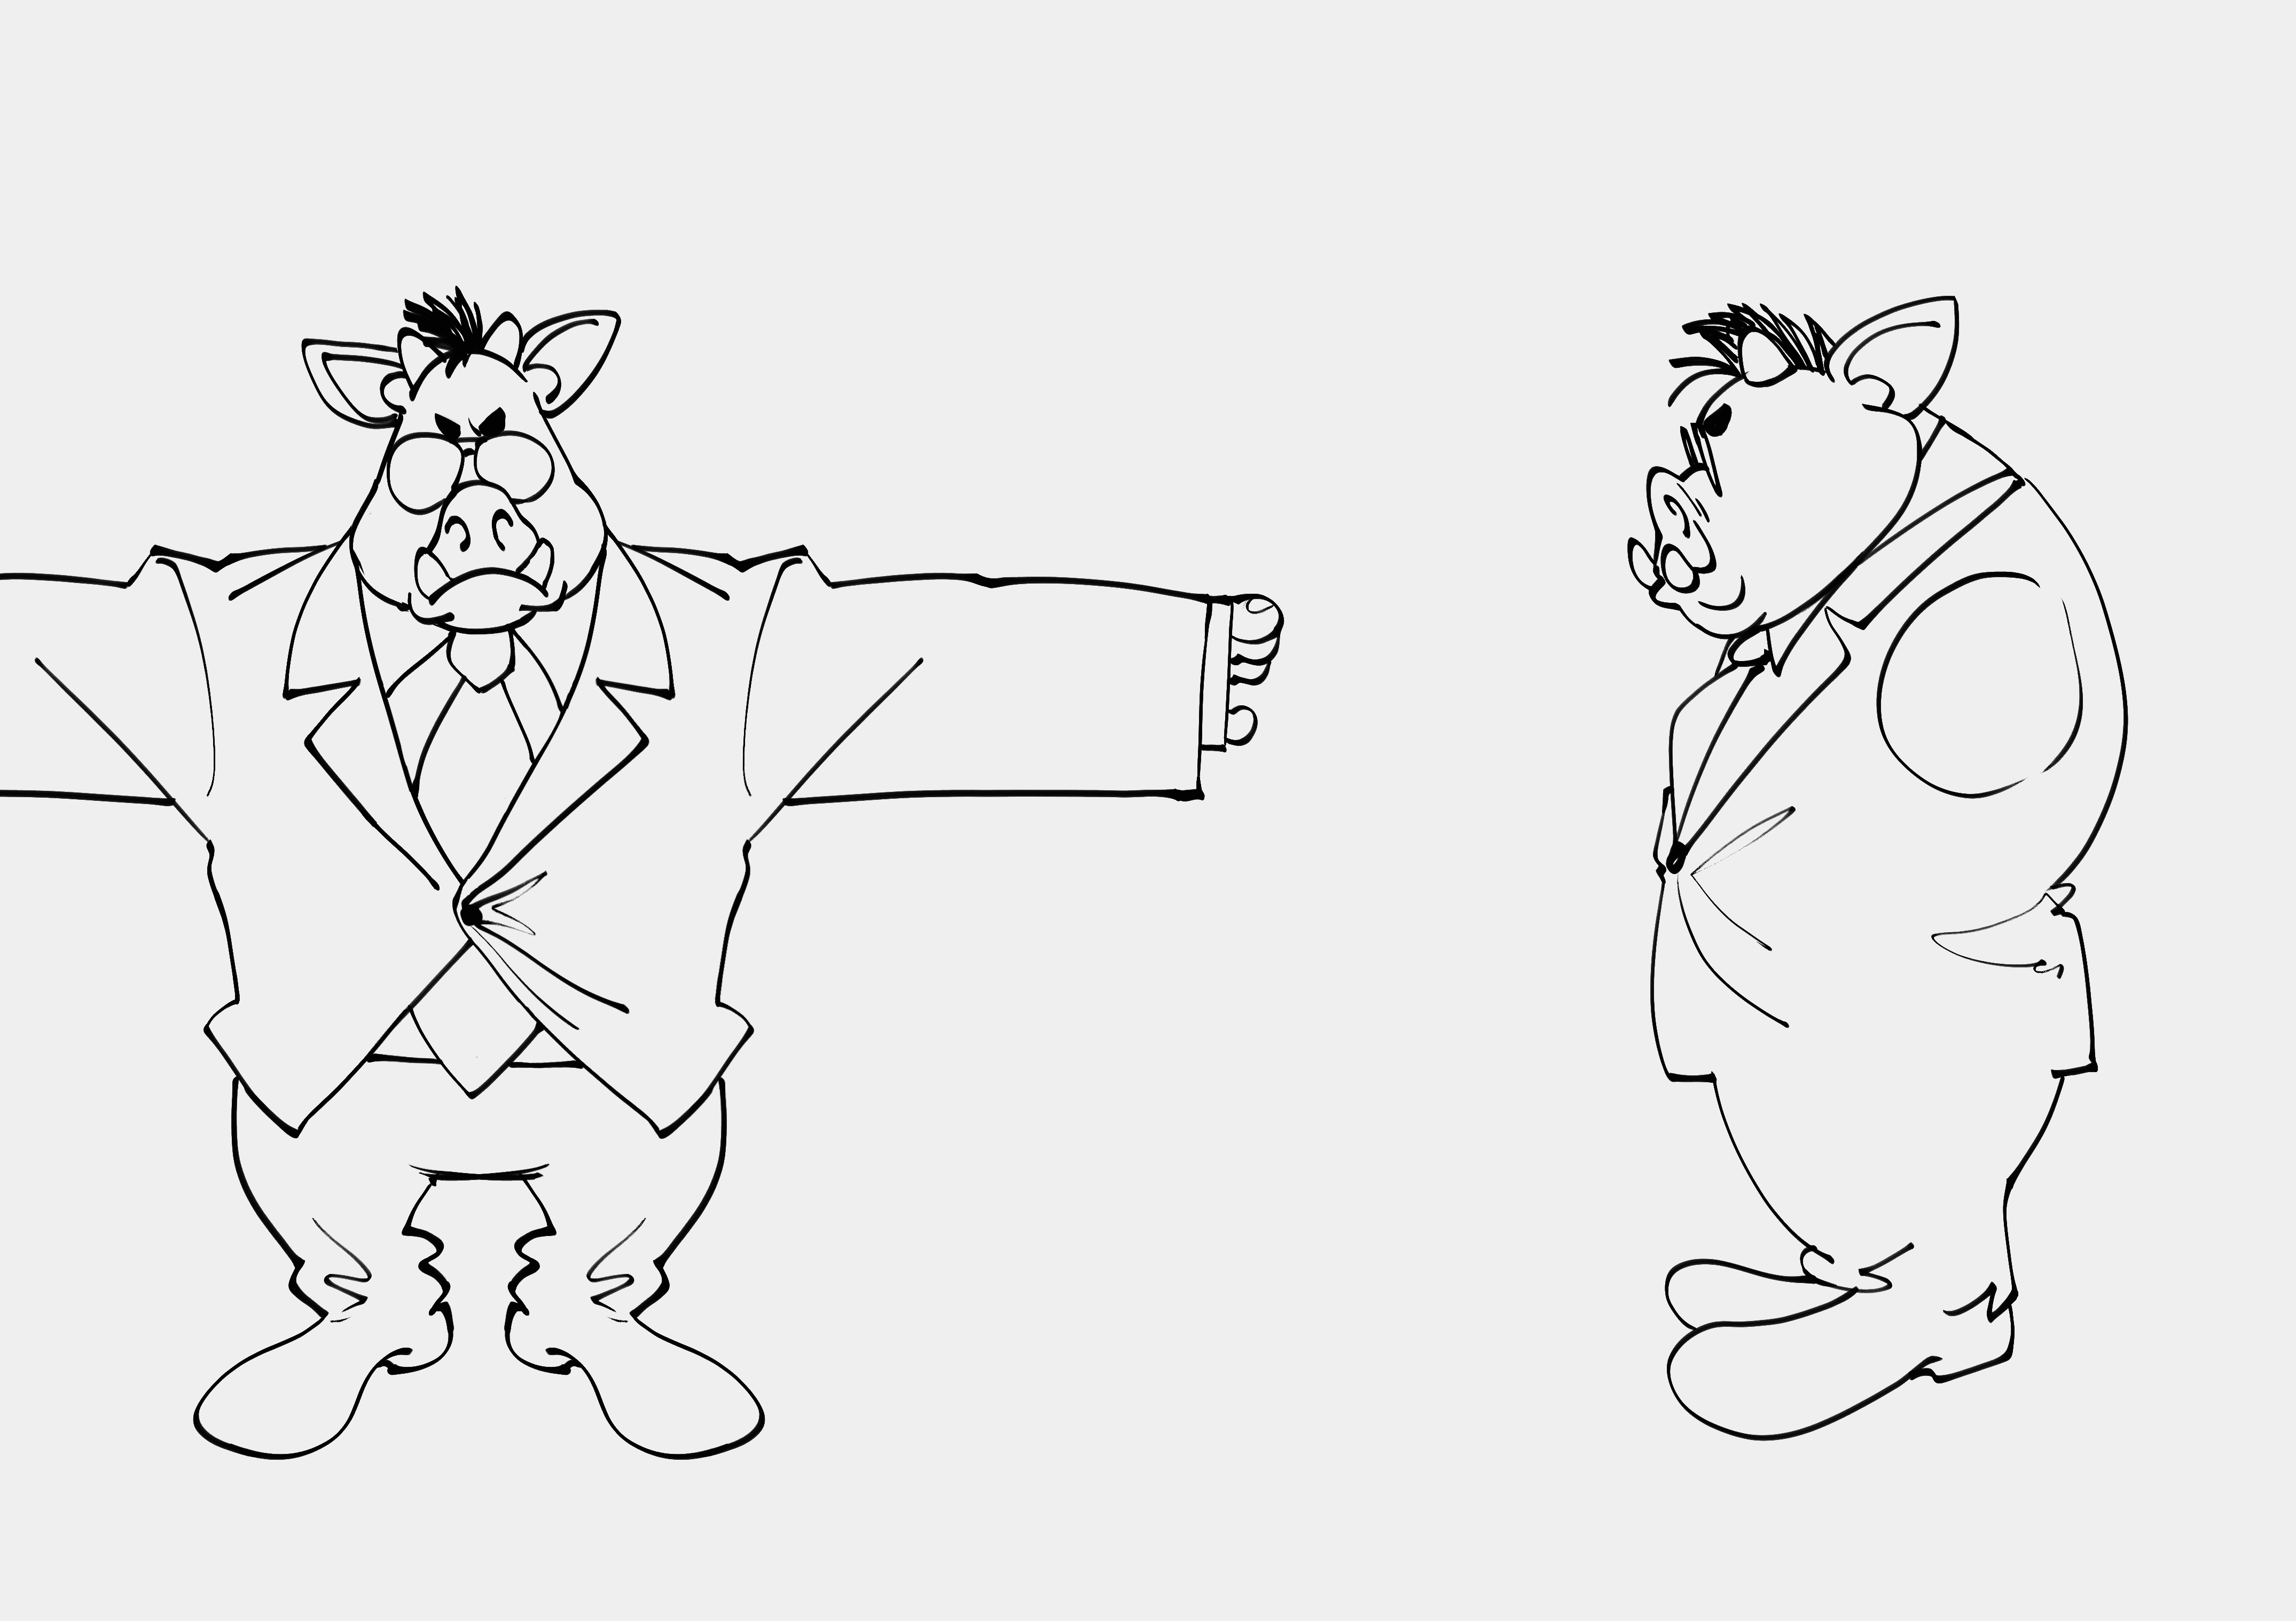
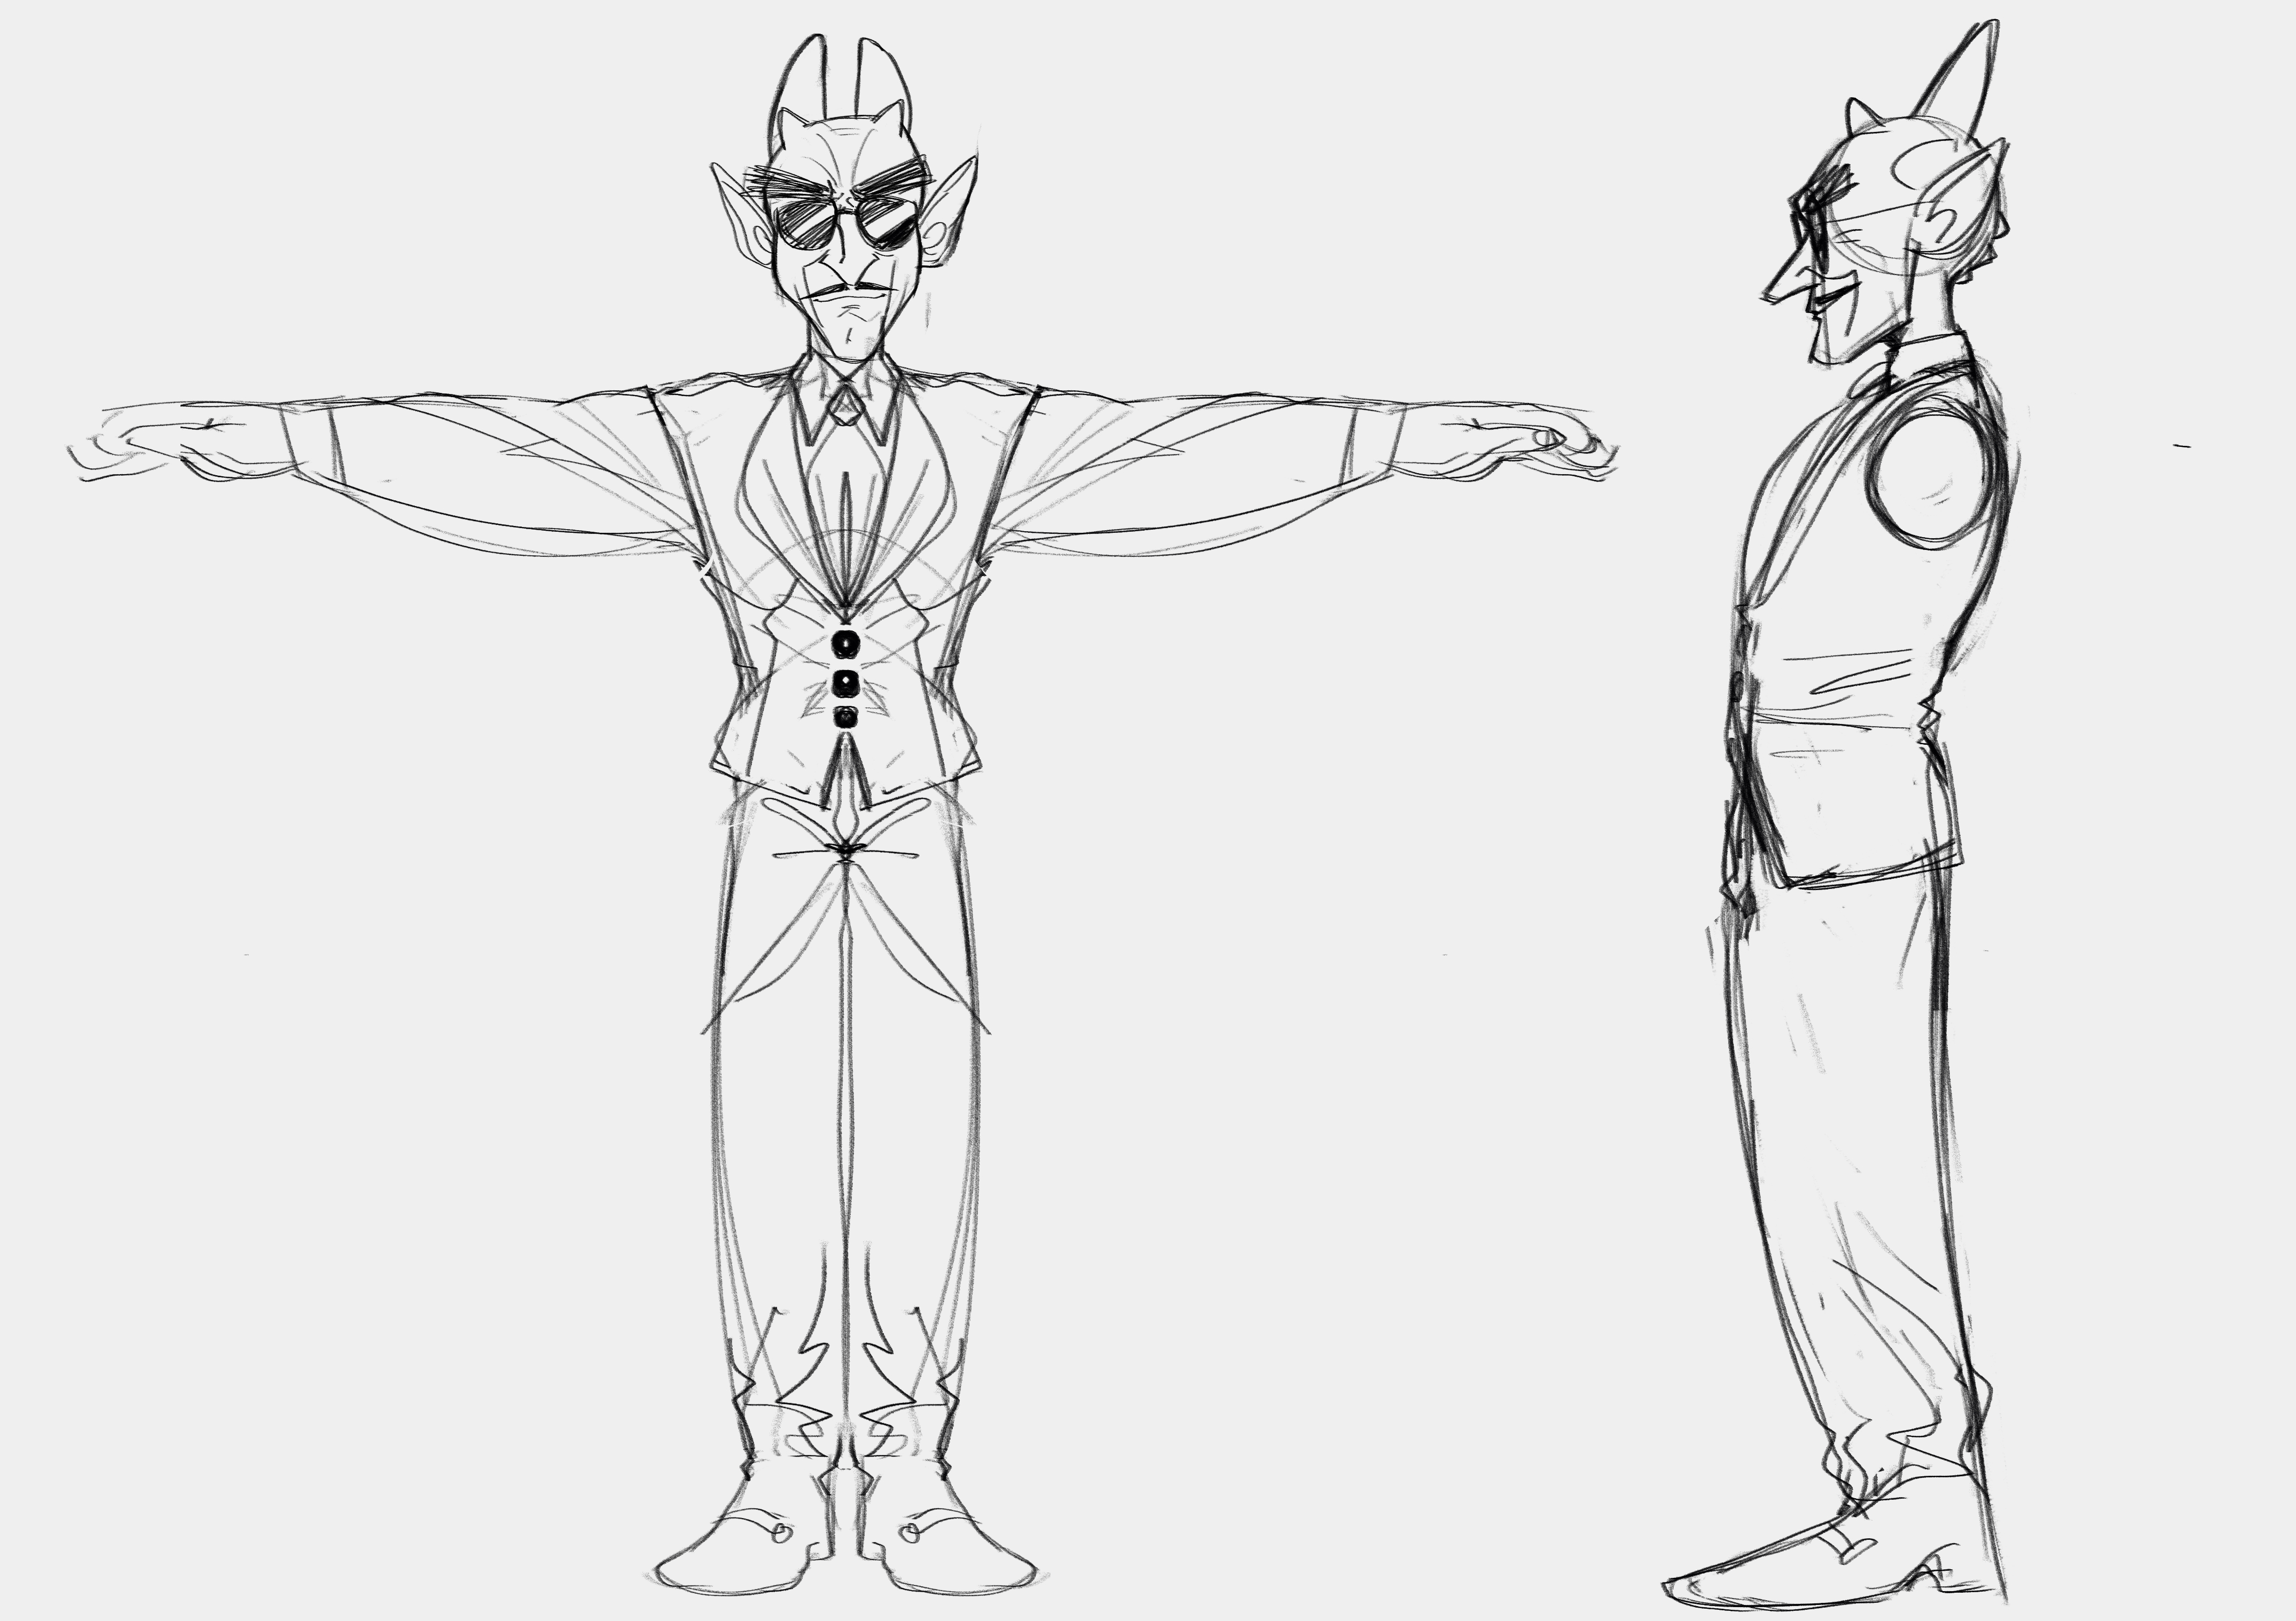
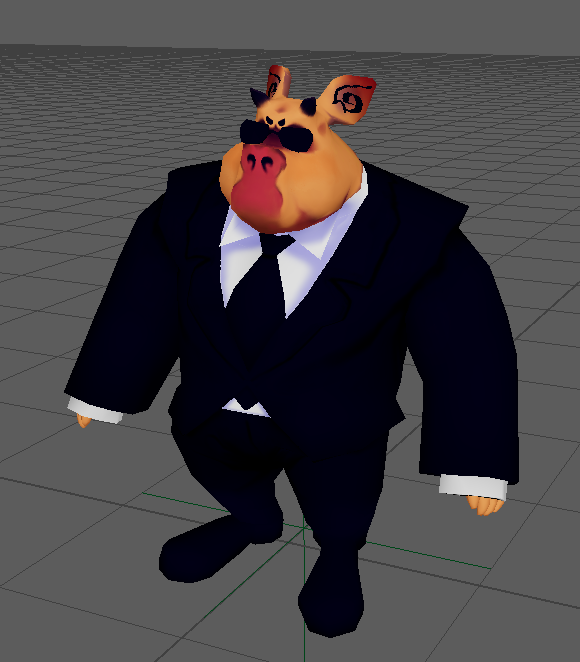
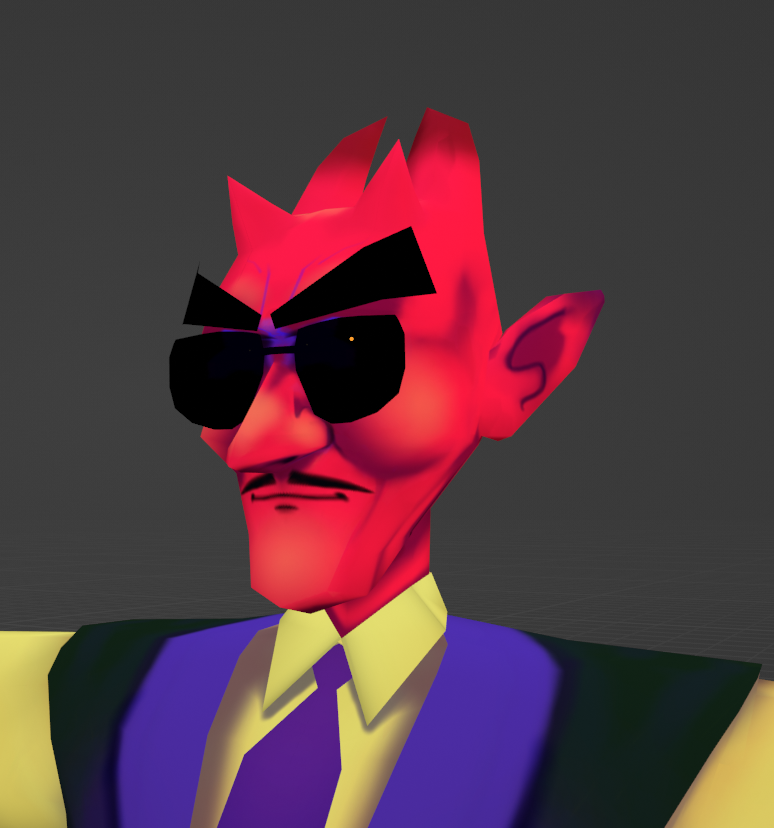
Now, I am by no means a character modeler. This was actually the most daunting part of the process for me. I get so caught up in polycounts and edge flow that I lose sight of what actually matters in the end. In my case, the edge flow of my topology only really mattered for my hand-painted textures and rig deformations. Below you can see some progress shots, and a close up of the main guy's face. I really love how my style translated over to 3D, and hand-painting made things a lot of fun. This tied in nicely with my background art as well, which uses a few layered, distorted planes to give the illusion of depth, even though I started with a flat PNG. The crowd in the dance floor shot use that same technique, along with some regular planes with silhouettes drawn on top.</p>
<p style="text-align: center;"><img src="https://static.ucraft.net/fs/ucraft/userFiles/sleepycynic/uploaded-media/pigprogress.png" alt="" width="437" height="356" data-height="450" data-width="553"></img> <img src="https://static.ucraft.net/fs/ucraft/userFiles/sleepycynic/uploaded-media/pig-prog-2b.png" alt="" width="311" height="355" data-height="348" data-width="305"></img>  <img src="https://static.ucraft.net/fs/ucraft/userFiles/sleepycynic/uploaded-media/mainguycloseup.png" alt="" width="332" height="355" data-height="383" data-width="358"></img></p>
<p style="text-align: center;"> </p>
<p style="text-align: center;"><img src="https://i.imgur.com/fKyAo8D.png" alt="" width="617" height="494" data-height="571" data-width="713"></img></p>
<p style="text-align: center;"> </p>
<h4>Music &amp; Lipsyncing</h4>
<p>
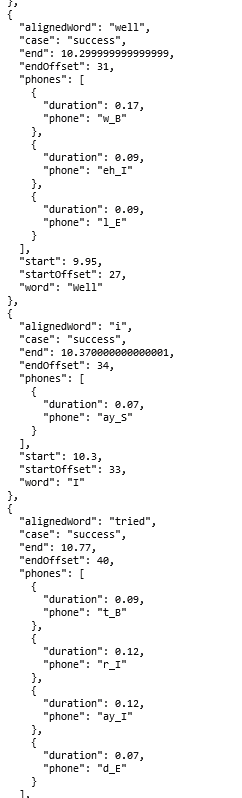
Most of the motion capture data is from Mixamo, with a few of my own motions thrown in there. I wanted to have more custom data, but the cleanup process proved too much for my time constraints. There was very little real animation on my part, besides some motion blending and procedural grasping on the hands (for this I just made an attribute on the wrists that controlled the clench of the fists, as the mocap didn't have any hand motion at all). Most of the animation work went into the lipsyncing cleanup, which you can read more about in my previous blog post. The process was essentially the same, though this time I was dealing with a longer song and more mouth shapes. My lipsync script scaled up nicely though. The most challenging part was editing down the audio into something manageable for the scope of the project. This wasn't the only reason though: I still had to mouth out the rapping and singing parts to get clean-enough data for the forced alignment portion. I am much less of a rapper than I am an artist/developer, but I think I managed okay this round :)</p>
<h4>Return to Unreal</h4>
<p style="text-align: center;"><iframe src="https://www.youtube.com/embed/QE_XVePLLPY" width="560" height="314" allowfullscreen="allowfullscreen"> </iframe></p>
<p> </p>
<p>This was one of my very first lighting tests. Rendering in real-time was a lot of fun. Being able to iterate so quickly on my shots was huge for my creative process, as it was much more forgiving than the alternative of making an artistic decision and waiting for Arnold to output an image. Learning Unreal's lighting and post-process systems proved challenging, but certainly worth it. A lot of the decisions I made in pre-viz made it to the final cut, such as the wider-shot dance floor scene. I also found room to improvise, like with the opening camera truck down the hall for the title sequence.</p>
<p> </p>
<p>
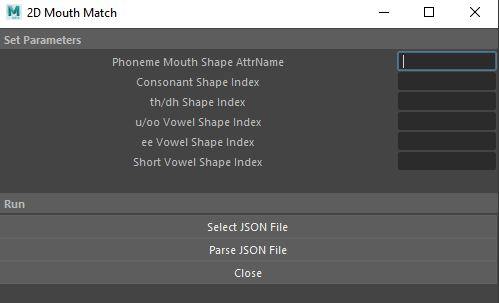
My first major hurdle was getting my lipsync data into Unreal. Ultimately I was able to export the Mouth Plane used for the lip shape image in Maya to its own animation curve in Unreal. I could then evalutate that curve in Unreal at each event tick to know which mouth shape to apply to the material. On the material itself, I just create a Dynamic Material Instance on the start. There's a Mouth Textures array that I pull from on each Actor. That's where I place all of the corresponding textures (as I would in Maya) and let the animation curve eval handle the proper index. Below is the Blueprint that I used for all of the characters in the scene.</p>
<p style="text-align: center;"><img src="https://i.imgur.com/yJxUMwN.png" width="916" height="447" data-height="704" data-width="1442"></img></p>
<p> </p>
<h4>Conclusion</h4>
<p>This has been a pretty lengthy blog post, but it's been long overdue. This was a great project for me, and I'm glad to have spent my last studio class on something that became so personal. My last semester at LSU was really specially. Between my capstone project, my virtual production class, and this, I was exposed to so many workflows and teams that I never thought I'd get a chance at. I've grown a lot, even in these past few months that I've been gone. I'm gonna finish this off before I get too sentimental, but thank you for reading!</p>
<p> </p>
<p> </p>
<p> <iframe src="https://www.youtube.com/embed/7d02xjZ4U8s" width="800" height="449" allowfullscreen="allowfullscreen"> </iframe> </p>]]>
            </summary>
                            <link rel="enclosure" href="https://static.ucraft.net/fs/ucraft/userFiles/sleepycynic/images/a-5-wdadesktopservicecy5nh4rkw7.png" length="1439478" type="image/png" />
                        <category term="Tech Art &amp; Rigging" />
            <updated>2022-11-07T19:31:45+00:00</updated>
                    </entry>
            <entry>
            <title><![CDATA[Mouthing Off: 2D Auto-Lipsync in Maya]]></title>
            <link rel="alternate" href="https://www.sleepycynic.com/tech-art-blog/tech-art-rigging/mouthing-off-2d-auto-lipsync-in-maya" />
            <id>https://www.sleepycynic.com/tech-art-blog/tech-art-rigging/mouthing-off-2d-auto-lipsync-in-maya</id>
            <author>
                <name><![CDATA[JaNiece Campbell]]></name>
                                    <email><![CDATA[jmc31899@gmail.com]]></email>
                            </author>
            <summary type="html">
                <![CDATA[<p> </p>
<h4>Intro</h4>
<p>I've been working with motion capture for a little while now, but never getting much deeper than introductory pipeline things. I've done some retargetting between Maya and Motion Builder, recorded data and cleaned it up, and even wrote a script to help me build a skeleton based on real-time capture (more on that in a later post). But now comes the grand question: what do I do with this information? Usually I like to start with such a query, and work my way through educating myself until I can answer that set question, but this time I was simply exploring just to explore. Which is fine, but it does leave me a bit aimless as I move further into R&amp;D. This has led me to identify other areas of interest, such as animation. Since I was a kid, I've always loved the idea of making music videos with cool chararcters singing along, but I distincting remember lip syncing to be a particular pain when animating in Maya.</p>
<p> </p>
<p>Enough exposition, let's talk scripting! As mentioned, I've been interested in making music videos since forever. I knew I wanted to have a character sing along to the music, so naturally lipsyncing would be a concern. I could've very well done it all by hand, but it would not be very "programmer" of me to not try to automate this process. I was inspired by the tool featured in this video:</p>
<p style="text-align: center;"><iframe src="https://www.youtube.com/embed/wQdCbclv94g?t=395s" width="560" height="314" allowfullscreen="allowfullscreen"> </iframe></p>
<p style="text-align: center;"> </p>
<p style="text-align: left;">This led me to discovering <span style="text-decoration: underline;"><span style="color: #3598db; text-decoration: underline;"><a style="color: #3598db; text-decoration: underline;" href="https://lowerquality.com/gentle/" target="_blank" rel="noopener noreferrer">Gentle</a></span></span>, a forced aligner that essential takes dialogue as an audio file and its transcripts, and aligns phonemes based on a time offset. Gentle is just one forced aligner of many, but at the time of writing it was a very good introduction to the concept and usage. Gentle handles the heavy work of language processing, outputting the phonemes and timings in both CSV and JSON formats. Below is a (very) small subset of example output, to demonstrate how it identifies phonemes in words and accompanying timestamps:</p>
<p style="text-align: center;"><img src="https://static.ucraft.net/fs/ucraft/userFiles/sleepycynic/uploaded-media/image48155926221639636730818.png" data-height="798" data-width="242"></img></p>
<p style="text-align: center;"> </p>
<p style="text-align: left;">The tool in the video programmatically interfaces with Gentle through HTTP requests, which I simply could not figure out how to do in my solution. This would be optimal addition to my script, but for now I just upload my transcript and audio to the<span style="color: #3598db;"><a style="color: #3598db;" href="http://gentle-demo.lowerquality.com/" target="_blank" rel="noopener noreferrer"> Gentle Demo</a></span> and save the JSON locally. Upon looking at the output, I knew my script would break into three main parts: receive any input parametes from the user, parse phoneme JSON file, and keyframe the mouth to match the phoneme shapes. For future reference, the JSON is formatted as follows:</p>
<pre>{
     transcript: ....,
     words: [
     {
           "alignedWord",
           "case": "success",
           "end",
           "endOffset",
           "phones": [
              {
               "duration",
               "phone"
             },
             ...
          ],
          "start",
          "startOffset",
          "word"
    },<br>    ....<br>    ]

}
</pre>
<h4 style="text-align: left;">Part I: Input Parameters</h4>
<p>At it's current iteration, there are 7 input parameters: the attribute name for the mouth shape, and 5 indecies representing the sprite to be used for that phoneme, and the JSON file generated by Gentle. This assumes that the mouth shapes are an image sequence for the sake of simplification.</p>
<p style="text-align: center;"><img src="https://static.ucraft.net/fs/ucraft/userFiles/sleepycynic/uploaded-media/image83498205541639637523614.png"></img></p>
<p style="text-align: center;"> </p>
<p style="text-align: left;">Going forward I would add more nuanced phonemes of course, but this was a good number to start with. When I first started this project, it was acutally only 3 shapes, so an extra 2 made a big difference (which I'll show a bit later). As for functionality, the values of each field are pushed to a 'mouthArray,' where the values at index 0-4 are the sprite number to be used for that phoneme. The indecies are as follows: 0 for consonants, 1 for th/dh, 2 for u/oo/w, 3 for ee/ey/t, and 4 for miscellaneous vowels (this will be replaced and expanded on in later versions). For example, my th/dh sprite is mouth3.png, so I put a '3' at mouthArray[1]. Confusing? Maybe, but bear with me!</p>
<p style="text-align: left;"> </p>
<p>Honestly the hardest part of this was writing GUI in Maya. Luckily the interface is pretty simple, but it was still way more trouble than it needed to be.</p>
<p> </p>
<h4>Parts II &amp; III: Parsing Input</h4>
<p>Now we have all necessary info from the user, so let's do something with the data. The ultimate result is to automatically keyframe at the appropriate times with match mouth shapes. Before getting into the actual parsing, let's assign sounds to the indecies provided by the user. For this I made a new function called '<strong>createKeys</strong>' that takes in a phoneme. This function simply returns the appropriate value defined by the user based on the provided sound. Usin my example from above, it the phoneme is 'th' or 'dh,' the function returns the value at mouthArray[1], as defined by the user (and we've already established that index 1 holds the value for th/dh sounds).</p>
<p> </p>
<p>The first thing I do is read the file provided by the user and load it as JSON. Then I get the 'words' part of the object in order to start iterating. For every word, I first check the 'case,' which states it that word was successfully aligned. If not, I just ignore it. Otherwise, we can get into the meat of the function. The first major component needed is the start time of the word, which is simply accessed by the 'start' property of the word object. I store this time in a variable called '<strong>start</strong>,' and create another variable called '<strong>newTime</strong>' set equal to 'start' (to be used later for calculating offsets).</p>
<p> </p>
<p>Next we iterate through each phoneme (called '<strong>phones</strong>' in this object). Phonemes are formatted like so: <span style="color: #000000;">xx_y,</span> where xx is the "main" sound of the current phone. I'm only working with the first part of the phoneme, i.e. the characters before the underscore. We can now pass this phoneme into the 'createKeys' function defined earlier and set it to a variable. Now all that's left for the keyframe is setting it using the provided attribute name and new value, like so:</p>
<p style="text-align: center;"><span style="color: #843fa1;">cmds.setKeyframe(value=shape, attribute=mouthAttrName, time='{:2.4}sec'.format(newTime))</span></p>
<p><span style="color: #000000;">Now all that's left is updating the time for the next phoneme. This part took me an embarrassingly long time to figure out, after getting thrown off by all of the offsets provided in the JSON. To get the new time, we just need to add the current phoneme's duration (provided by the 'duration' property of the object) to the 'start' time we set earlier. </span></p>
<p> </p>
<p><span style="color: #000000;">And that's all for this script! A little over 100 lines, so not too bad at all. Now for some comparisons (featuring my very silly and cute marshmellow man that I made in 5 minutes):</span></p>
<p style="text-align: center;"><video src="https://i.imgur.com/bzsrhuR.mp4" controls="controls" width="889" height="500">
<source src="https://i.imgur.com/bzsrhuR.mp4" type="video/mp4"></source></video></p>
<p style="text-align: center;"> </p>
<p style="text-align: left;"><span style="color: #000000;">The idea of forced alignment is still very new to me, and at the time of writing I'm still looking for better ways to integrate it into the pipeline. The audio used in this demo is also not ideal (you can see some of the syncing issues a bit later in the audio), as the aligner works best with spoken word and dialogue rather than songs. My current workaround is to record a spoken version of the song synced with the original timings, and just use that to generate the JSON instead. This has given me fairly clean results, especially compared to above. Either way I think this is a solid start, and has lots of potential to grow.<br></span></p>
<p style="text-align: left;"> </p>
<p style="text-align: left;"><span style="color: #000000;">Thanks again for reading, see you next time!</span></p>
<p> </p>]]>
            </summary>
                            <link rel="enclosure" href="https://static.ucraft.net/fs/ucraft/userFiles/sleepycynic/images/a-4-lipsyncwow.png" length="151451" type="image/png" />
                        <category term="Tech Art &amp; Rigging" />
            <updated>2021-12-18T04:38:05+00:00</updated>
                            <dc:description><![CDATA[2D Lipsyncing in Maya using Forced alignment]]></dc:description>
                    </entry>
            <entry>
            <title><![CDATA[Kinect v1 Adventures: Unreal Engine 4]]></title>
            <link rel="alternate" href="https://www.sleepycynic.com/tech-art-blog/tech-art-rigging/kinect-v1-adventures-unreal-engine-4" />
            <id>https://www.sleepycynic.com/tech-art-blog/tech-art-rigging/kinect-v1-adventures-unreal-engine-4</id>
            <author>
                <name><![CDATA[JaNiece Campbell]]></name>
                                    <email><![CDATA[jmc31899@gmail.com]]></email>
                            </author>
            <summary type="html">
                <![CDATA[<p>First thing's first: why am I bothering with trying to connect an 8 year old depth sensor to UE4? Well it's mostly because I'm too stubborn and lazy to go to the mocap studio on campus when I have a perfectly usable (?) Kinect right at home! Is that a good reason? No! But nonetheless this whole thing proved to be a fun little exercise in learning Unreal and refactoring old C++, so I have no real regrets about doing it. You can find my work on my<span style="color: #236fa1;"> <a style="color: #236fa1;" href="https://www.github.com/iAmThe1neAnd0nly/KinectXbox360-UE4" target="_blank" rel="noopener noreferrer">github repo for this project</a>.</span></p>
<p> </p>
<p>Naturally this all started with some research. What were the current prospects from markerless mocap like for Unreal 4? I already knew about LiveLink and Rokoko thanks to LSU's onsite mocap studio, but what if I can't be on campus for some reason and need a quick and cheap alternative? Yes I know the data isn't nearly as clean, but that's not really what this is about for me. I'm more interested in what's possible, even in its earliest, roughest stages. As far as markerless setups go, I'm somewhat familiar with <span style="color: #236fa1;"><a style="color: #236fa1;" href="https://www.ipisoft.com/2021/03/ipi-soft-announces-real-time-integration-for-unreal-engine/" target="_blank" rel="noopener noreferrer">iPi Soft</a></span> from my earlier forays into mocap. The price tag, however, is not doable for me right now (and my school can't cover it either). I should note that my goal for this is <strong>live </strong>motion capture, and simply recording it from another software (like mesh-online's mocap recorder) is certainly doable. It should also be noted that a lot of these solutions require a much newer Kinect than the one I'm using (which was to be expected). So those are two limitations already in place: it has to be live, and it has to work with the Kinect v1. So what next?</p>
<p> </p>
<p>My digging led me to a GitHub repo initally created in 2014, and last updated in 2017. <a href="https://www.github.com/AleDel/KinectXbox360-UE4" target="_blank" rel="noopener noreferrer"><span style="color: #236fa1;">AleDal's KinectXbox360-UE4 plugin</span></a> seemed to be exactly what I needed. I look at the installation instructions, which seemed simple enough:</p>
<p> </p>
<p style="text-align: center;"><img src="https://static.ucraft.net/fs/ucraft/userFiles/sleepycynic/uploaded-media/image86118297231637877915587.png"></img></p>
<p> </p>
<p>So I create a new C++ project in Unreal, close Unreal to load in the plugin, reopen the project to enable the plugin, and try to restart to compile it. And I get a message saying that one of the KinectPlugin module is missing or was built in a different version (which makes sense).</p>
<p> </p>
<p style="text-align: center;"><img src="https://static.ucraft.net/fs/ucraft/userFiles/sleepycynic/uploaded-media/image70143627661637878848582.png"></img></p>
<p> </p>
<p>So then I hit yes to rebuilding, and let it do its thing. A few minutes later I get this very helpful message:</p>
<p> </p>
<p style="text-align: center;"><img src="https://static.ucraft.net/fs/ucraft/userFiles/sleepycynic/uploaded-media/image98692558851637878821477.png" data-height="149" data-width="379"></img></p>
<p> </p>
<p>Now you should know that I actually didn't know what that meant, as I neither use C++ all that often nor have I ever even made a C++ Unreal Project before. So I tried the <strong>Generate Visual Studio project files</strong> option as a more explicit compilation, yet that also continued to fail.</p>
<p> </p>
<p style="text-align: center;"><img src="https://static.ucraft.net/fs/ucraft/userFiles/sleepycynic/uploaded-media/image18490258141637878034538.png"></img></p>
<p> </p>
<p>I do a bit more research and find out that I can just try to compile it with Visual Studio to get actual errors that I can (attempt to) fix! And I do just that. Opening up the VS Solution and building certainly gave me an informative slew of errors that I could start working my way through:</p>
<p> </p>
<p style="text-align: center;"><img src="https://static.ucraft.net/fs/ucraft/userFiles/sleepycynic/uploaded-media/image27487265871637880353706.png"></img></p>
<p style="text-align: center;"> </p>
<p style="text-align: left;">This is the part where I start refactoring all of the outdated code. The first lines I tackled were the <strong>Cannot open include file: 'ModuleManager.h': No such file or directory</strong> and the <strong>Cannot open include file: 'AllowWindowsPlatformTypes.h': No such file or directory</strong>.</p>
<p>After some digging online, it turns out that these depenedancies required a more explicit location in newer versions of Unreal. In the original files, the lines that were causing trouble were: <strong>#include "ModuleManager.h", #include "HideWindowsPlatformTypes.h",</strong> and <strong>#include "AllowWindowsPlatformTypes.h"</strong>. The fix for these was simply to change them to <strong>#include "<span style="color: #843fa1;">Modules/</span>ModuleManager.h",  #include "<span style="color: #843fa1;">Windows/</span>HideWindowsPlatformTypes.h", </strong>and  <strong>#include "<span style="color: #843fa1;">Windows/</span>AllowWindowsPlatformTypes.h"</strong></p>
<p> </p>
<p>With another build (and a prayer), I hoped that resolving those include statements would fix my issue. Of course, here's what I get now:</p>
<p> </p>
<p style="text-align: center;"><img src="https://static.ucraft.net/fs/ucraft/userFiles/sleepycynic/uploaded-media/image80383486481637881204913.png"></img></p>
<p> </p>
<p> </p>
<p>That's a lot more than I got originally! If I know anything about programming (debatable) it's that this is probably caused by something deceptively simple. I first notice that the bulk of these errors coming from roughly the same code chunk in the KinectSensor.cpp file. My instincts told me to look into that <strong>ENQUEUE_UNIQUE_RENDER_COMMAND_FOURPARAMETER</strong>.</p>
<p> </p>
<p style="text-align: center;"><img src="https://static.ucraft.net/fs/ucraft/userFiles/sleepycynic/uploaded-media/image975842561101637881862217.png"></img></p>
<p style="text-align: center;"> </p>
<p style="text-align: left;">Like I said earlier, I rarely use C++, so I had no idea what I was looking at here. I would soon learn that this is C++'s flavor of a lambda expression. As for the ENQUEUE function itself, I found out from <span style="color: #236fa1;"><a style="color: #236fa1;" href="https://zhuanlan.zhihu.com/p/78799180" target="_blank" rel="noopener noreferrer">here </a></span>that its parameters worked like so:</p>
<pre><code>ENQUEUE_UNIQUE_RENDER_COMMAND_FOURPARAMETER(TypeName,ParamType1,ParamName1,ParamValue1,ParamType2,ParamName2,ParamValue2,ParamType3,ParamName3,ParamValue3,ParamType4,ParamName4,ParamValue4,Code)</code><br><br></pre>
<p>The problem with this function is that it's been deprecated in the newer API, and needed to be converted into the newer equivalent of ENQUEUE_RENDER_COMMAND. The only thing I could find about reworking this function is from this<span style="color: #236fa1;"><a style="color: #236fa1;" href="https://forums.unrealengine.com/t/how-to-use-enqueue_render_command-instead-of-enqueue_unique_render_command_oneparameter/125007" target="_blank" rel="noopener noreferrer"> forum post</a></span>. The response on it wasn't directly helpful, but it was enough to get an idea of what needed to go where. The lambda expression in C++ takes the form of:</p>
<p> </p>
<pre><span style="color: #843fa1;">[ captures ] ( params ) lambda-specifiers requires(optional) { body }</span></pre>
<p> </p>
<p>All I did in my solution was define and assign the captures before the lambda, as the next few errors were complaining about <code><span style="font-family: Lato;">undefined</span></code> identifiers. For the structure of the lambda, I just mirrored what was laid out in the forum post as a start. I passed in the original params as captures to the lambda, and the body itself stayed the same.</p>
<p> </p>
<pre><span style="color: #843fa1;">const void* ImageData = buffer;       
int32 Stride = Width * 4;       
FKinectTextureParams Params = m_RenderParams;</span></pre>
<pre><span style="color: #843fa1;">ENQUEUE_RENDER_COMMAND(ImageData)(              </span><br><span style="color: #843fa1;">            [Stride, Params, &amp;ImageData] (FRHICommandListImmediate&amp; RHICmdList) {</span><br><span style="color: #843fa1;">                RHIUpdateTexture2D(Params.Texture2DResource-&gt;GetTexture2DRHI(), 0, *Params.UpdateRegions, Stride, (uint8*)ImageData);</span><br><span style="color: #843fa1;">            }); </span></pre>
<p> </p>
<p>We compile and...</p>
<p> </p>
<p style="text-align: center;"><img src="https://static.ucraft.net/fs/ucraft/userFiles/sleepycynic/uploaded-media/image992225317111637890024813.png" data-height="96" data-width="1210"></img></p>
<p> </p>
<p>It looks so much better already! Now just a few more minor errors to clean up. I start with the <strong>FTexture2DResource.</strong> This is yet another instance of a deprecated type, which was replaced by <strong>FTextureResource. </strong>I just replaced all mentions of the original (in both the .cpp and corresponding header file) with the new type. As for the<strong> fmin </strong>error, I added an include statement for the cmath library. I'm still not too sure what this one is about honestly. But after making these changes, things compiled with no error!</p>
<p> </p>
<p>Is this done properly? I have no idea, since I haven't tested the texturing from the plugin yet. But this was enough for it to compile properly, and any fixes that need to be done can be done later. Now I head back into the engine to see what the acutal Blueprints have in store for me.</p>
<p> </p>
<p>The only things I really had to do were to drop in a copy of the BP_Bones, assign the skeletal mesh to the PoseableMesh (I just used the one provided in the examples from the OG repo), and added some print string nodes just to make sure my Kinect and skeleton were acutally being detected. And now for results!</p>
<p> </p>
<p style="text-align: center;"><video src="https://i.imgur.com/HmR2lVz.mp4" controls="controls" width="600" height="300">
<source src="https://i.imgur.com/HmR2lVz.mp4" type="video/mp4"></source></video></p>
<p> </p>
<p>Live mocap capture in Unreal 4 using a Kinect v1! It's super janky, but it's fascinating that it still works after all these years (with just a little elbow grease on my part). Next I'll need to figure out how to retarget this skeleton to another character. But for now, I'm content with it as is. Thanks for reading, and see you next time!</p>]]>
            </summary>
                            <link rel="enclosure" href="https://static.ucraft.net/fs/ucraft/userFiles/sleepycynic/images/a-3-unrealkinectwow.png" length="149702" type="image/png" />
                        <category term="Tech Art &amp; Rigging" />
            <updated>2021-11-26T21:43:52+00:00</updated>
                    </entry>
            <entry>
            <title><![CDATA[Hello World!]]></title>
            <link rel="alternate" href="https://www.sleepycynic.com/tech-art-blog/tech-art-rigging/hello-world" />
            <id>https://www.sleepycynic.com/tech-art-blog/tech-art-rigging/hello-world</id>
            <author>
                <name><![CDATA[JaNiece Campbell]]></name>
                                    <email><![CDATA[jmc31899@gmail.com]]></email>
                            </author>
            <summary type="html">
                <![CDATA[<p>I don't know how you ended up here, but welcome! For now I'll be treating this as a journal of my personal victories and defeats in the world of rigging and technical art. Honestly I don't have a full grasp on what these terms mean, but this blog will give me space to figure it all out. I'm excited, scared, and extremely curious as to how all of this goes (documentation and all). To the reader: thank you for stopping by and listening to me ramble. To future me: good luck!</p>]]>
            </summary>
                            <link rel="enclosure" href="https://static.ucraft.net/fs/ucraft/userFiles/sleepycynic/images/a-2-xjxwbfso2f0.jpg" length="94241" type="image/jpeg" />
                        <category term="Tech Art &amp; Rigging" />
            <updated>2021-11-25T04:49:22+00:00</updated>
                            <dc:description><![CDATA[The start of my technical art and rigging blog]]></dc:description>
                    </entry>
    </feed>
